Sunday, March 30, 2008

Fender progress


I added two layers of Kevlar this morning (with help from my neighbor- thanks again!) The fleece hardened up really well and made a good surface to mold to. I used some liquid poly wax as a release agent and I think it was working a little too well...we had a tough time getting the first layer to stick. The second layer went on easily and laminated thoroughly. The creases aren't super-sharp, but that's what you get using a moldless process. Overall I'm pretty happy and it looks like the technique will work well enough to do the rears as well.
I should be able to release and trim the fenders in the next day or so (the epoxy has a longer cure time due to the cold weather.) Meanwhile I'm prepping the rest of the panels for fleece. The driver's front is done, I just need to cut the MDF for the rears.

Saturday, March 29, 2008

Started making the new fenders---

Today I finally got around to starting on the fenders. I'm using a composite technique called "fleece" where you stretch some fabric over a wooden form to get a smooth shape or curve. Fleecing works perfectly for the shape of these fenders. I used 1/4" MDF to cut the wheel shape and the flare. The flare is about 2.5".

Next I stretched some cotton spandex over the forms ( I hot-glued the wood to the body to hold it in place). 3M 77 spray adhesive holds the fabric to the wood and body.


...taking shape!


Here is the fleece with a couple thin coats of epoxy. The epoxy will give the fleece just enough stiffness to add the layers of composite fabric. After the Kevlar is molded, I can release it from the fleece and removed the wood forms.


Friday, March 28, 2008

Doors are for wusses.

I took of the doors today in preparation for making the new fenders. I was pretty surprised to find they weigh 30lbs each, even though they are completely gutted and most of the sheet metal has been removed. I'm going to consider making some new door skins made from composite and just pin them to the car. It's easier to "Dukes of Hazard" in and out of the car anyway. 50lbs off the car would be great, especially since I added about 150lbs from the cage.

Thursday, March 27, 2008

Kevlar testing and passenger seat installed

I made a test piece of the Kevlar fabric and wetted it out with epoxy- the Jeffco epoxy seems to work well with the fabric, even in the low temperatures (50 degrees F). I'm using the Jeffco quick-set epoxy, it works a little better in the cold. You can buy it at http://www.aircraftspruce.com/
Two layers of fabric should be enough for the fenders, the sample is pretty rigid, similar to sheet metal. The plan is to mold the new fenders from the existing ones, then cut away as much of the old one as possible to save a little weight.


The passenger seat has also been installed, it is the same as the driver's seat, except it's an inch wider (16") to accommodate a wider range of passengers. I haven't decided if I'll add the halo to the seat yet, I may have to in order to comply with instructor safety rules. Some clubs specify that the instructor or passenger's seat must have identical safety equipment as the driver's.

Friday, March 21, 2008

Wing supports finished, rear firewall added


I finished the wing supports, it is now very rigid. You can easily push the car by the wing, and it's very stiff laterally as well - the whole car rocks back and forth if you push the wing. I had to fabricate a lower brace in the trunk to stiffen up the sheetmetal- it added some weight, but I can use a little weight in the rear anyway.


I also made a new rear firewall since we cut out the original to fit the roll cage. I used 20 gauge sheetmetal and used a cardboard template to finalize the shape. I am going to use epoxy with micro to fill the seams, or a little caulk or something.


My Kevlar fabric arrived, so I'm getting ready to make my new fenders. Kevlar is a pain to cut, but I found a special pair of snips at Home Depot that seem to do the job --- Wiss MPX serrated blade shears. They were about $15 (versus $65 for the special Kevlar shears) and they cut the fabric well, as long as it is under tension. If you don't hold the fabric taut, it is almost impossible to cut.


Tuesday, March 11, 2008

Wing supports cut to proper height-


Yes, I know my garage is a disaster. I need a 10,000 sq ft workshop. I cut the wing supports down about 8", now it's a little less crazy...maybe even a little DTM style which isn't bad.

Sunday, March 9, 2008

Hahaha...this is just a test...

No, I'm not keeping the wing like this...I figured it would be easier to cut the wing down to the right height instead of adding to it to make it higher. I love the photo, funny.

I also fab'd up an X brace out of aluminum tube to add some lateral support. Not the most elegant solution, but I really don't want to use guy wires or anything.

Saturday, March 8, 2008

Super-ridiculous wing fabrication begins!


I really want my rear wing to be functional, so that means making my own. Most of the wings on the market are designed for looks, and not much function. One of the most important things for wing efficiency is getting it "clean" air...not the turbulent crap spinning close to the trunk. My solution- raise it as high as I can! In the end it will be almost level with the roof line...should look pretty lame, oh well.

I started with some 1/8" aluminum and plasma cut the shapes using a cardboard template. The wing will mount to the floor of the trunk and tie in to the rear crash rails for extra support. I cut some slots near the license plate to allow the supports to go through uninterrupted.

MIG welding aluminum is possible, but a big pain in the ass. Get a spool gun or a TIG. I got the job done, but I had to fix the spool every 2 minutes due to feed problems.

Wednesday, March 5, 2008

Ghetto-fabulous wheels arrived!


My new cheapo wheels came in - Sportmax 16x8"s. They aren't my favorite, but they were the right width, bolt pattern and offset. For $99 each, I guess I can't complain. Someday I'll add the $800 (each) custom Kodiak wheels. Anyway- the wheels are 8" wide with 0 offset, so they stick out quite a bit...at least until I fab up my new fenders to cover them. For tires I'm using Sumitomo 16-245-45s...pretty damn wide. I think the section width is almost 11". Tirerack shaved them to 4/32nds for me so they should be pretty grippy. $69 each too, plus $15 each for shaving. I also had to get special tuner lugnuts from Summit Racing, my old lugnuts wouldn't fit in the holes.

Monday, March 3, 2008


The cage is 95% done, I just have to finish a few welds on the A and B pillar ties ( I ran out of welding gas). I'm very pleased with how it came out, very strong and it stiffened the chassis 1000%. I may add a few more gussets in the future, but for now I think it is in good shape, and according to the rules if meets or exceeds all the regulations. I had to pop out the windscreen to get to a few welds, and of course I broke it in doing so. Luckily a replacement is only about $200, and it's always nice to have a brand new non-pitted windscreen.

I also removed the HVAC system. I was going to keep the heater, but my goal of low weight and simplicity overrode the convenience of heat. I guess we'll see if I made a good decision the first time I drive out to the track at 6am on an Autumn day. Removing the HVAC system allows for a lot of simplification of the wiring harness too, and simpler is better on a race car, especially when tracing a bad ground or other electrical gremlin.

Wheels and tires are on order- I bought an inexpensive setup for this year until I decide to drop the $2700 on custom Kodiak wheels.

Monday, February 11, 2008

Cage progress


We took the car over to another friend's shop to do most of the cage fabrication since it is about triple the size of my garage, and he has all the proper tools too. Thanks again! The main hoop fits very snug, which is great. Looks like the whole cage will fit very well, tight against the A and B pillars. A few things are tacked into place and we are fitting more tubes day by day. It's a slow process because the fit of each pipe has to be close to perfect, and the tube junctions can be pretty complex in a few spots. My friend that's helping me is doing a great job though, he has a lot more patience than I do. It's also nice that he can work on it all day everyday since he's out of work right now :)

Thursday, February 7, 2008

Prep for the Cage


The cage kit came a few days ago from Kirk Racing. It's basically the main hoop with a few pieces tacked together, then the rest is just a bunch of tubes (about 150lbs worth). We'll have to notch all of them ourselves, oh well. I thought I would get a little more for close to $800. I bought a tube notcher at Harbor Freight for about $40, so it shouldn't be too bad.

My buddy and I ripped out the dashboard in preparation for the dash bar install. I can pretty much guarantee that the dash won't ever be inside the car again...I think it would be a huge pain to try and fit it back in. I will plan on making a new dash after I buy an aftermarket gauge cluster.

Next we have to remove all the paint where the cage points will mount and plan the layout of each piece. I'm really glad i already cut the roof off, I have no idea how we could fully weld the cage otherwise.

Sunday, February 3, 2008

Lexan windows installed


The rear lexan windows are finally in, it was a lot more work than I tough it would be. I first had to weld on a bunch of "anchor nuts" (thanks www.aircraftspruce.com !) to the window channel which proved difficult. The nuts have tabs on them, but the steel was very thin and hard to weld correctly. I bought a 4x8 sheet of 1/8" Lexan from Silver State plastics for about $100. 4x8 is plenty to do all 4 windows. After making a template out of cardboard, I used a router to cut the Lexan and a belt sander to smooth out the cuts. A little black paint around the edges finished up the project nicely.
I'm a little burnt out on doing the windows for now, but the fronts will have to be done as well, just for some shred of comfort when driving to the track in cold weather. Since I used anchor nuts, I can unscrew a few bolts and remove the window completely for track days if the club doesn't allow fixed windows.

Thursday, January 31, 2008

Fuel Cell halfway installed


I bought a used 15 gallon fuel cell from my neighbor and got it halfway in the car. It's no "Fuel Safe" cell, but it will do the job well without costing $700. I first used the plasma cutter to get rid of the spare tire well, then I cut a circle of 20 gauge steel to cover the hole. I used a spot-weld method to attach it to the car, which worked much better than I thought it was going to. Now there is a ton of room under the car for a diffuser...if I ever get around to making one.

I cut a hole in the new steel to make room for the sump on the bottom of the tank. I am planning on routing the lines into the trunk to a fuel pump, then back under the car to the fuel rail. The removal of the old tank will hopefully shed some more weight as well as make some room for my side-exit exhaust I'm planning.

Monday, January 28, 2008

Kirkey Race Seat Installed


The Kirkey race seat finally arrived...it took about 4 weeks to get a 15" size, I guess they aren't that popular. I just wanted the thing to fit as perfect as possible, and 16" was too loose. It is the intermediate road race version, and I added the Halo head restraint. To attach the seat to the car, I welded some aircraft-spec bolts to the chassis and lined up the brackets.

I decided to not buy the seat cover, I'm going to place some fire-proof foam in a few key areas instead. The seat is about 6" lover than the other one, and I can barely see over the dash! This is great for center of gravity, but bad for visibility. A little foam on the bottom should help a bit. The halo is a nice touch, hopefully it will help limit lateral head movement in a side impact. The seat also feels like it will work with a HANS nicely. Overall, I think it's a great seat for the price. After I add a seat-back brace, it should be a very safe solution.

Monday, January 7, 2008

Hood and trunk fitted and trimmed


The hood and trunk lid are done, the carbon work came out nice. The hood has been pinned and attached with quarter turn fasteners, I'll post photos later. The hood weighs about 7 lbs, although I will probably add some heat shielding to it soon, bumping the weight to about 9 lbs. I think the trunk lid is about 4 lbs.

Short throw shifter and SS brake lines installed

I finally got around to installing the short throw shifter and bushings I bought a while ago. The shift lever is from a 2.3L Z3 (I think) and the throw is greatly reduced. Installing just the shifter is pretty easy, but if you want to replace the bushings in the linkage, that is where things get tricky.

The recommended procedure is to remove the exhaust system, heat shields and driveline, then lower the transmission 3" to access the linkage. After looking at what a pain it was going to be to remove all that, I almost gave up...until I remembered- THE PLASMA CUTTER! I cut a 3"x4" hole in the transmission tunnel and drove out the retaining pin and cir clip without any trouble. I replaced the badly worn bushings at the selector rod and finished up in about 20 minutes. That is definitely the way to do it, thanks plasma.

I also installed some stainless braided brake lines and bled out the super old brown fluid and replaced it with some Wilwood 570. Easy job, except for the inboard rear lines...I'll tackle those when I replace the diff.

Sunday, December 16, 2007

External Kill Switch Installed


The external electrical kill switch is installed and seems to work well. I used a 4-pole switch from Pegasus, that way I can kill the alternator feed at the same time. The cables were a little tough to bend into the area I put it, but everything seems to fit well. I also installed the Odessey battery right behind the passenger seat, with 4 gauge cable feeding the power block. A braided ground strap is installed directly to the body.

Friday, November 30, 2007

Electrical work-


I decided to tackle the electrical system in the car...or at least simplify it a little. I got rid of the power windows, power locks, power mirror wiring, stereo, speakers and some misc wires that didn't seem to do anything. Every once in a while I would fire up the car just to make sure it still started. After mapping the tail lights and fuel pump wiring, I ripped out pretty much everything else in the back half of the car. All this added up to about 28 lbs of wire out of the car.
Next I removed the original battery from the trunk and shortened the cables so that I can mount my new lightweight battery behind the passenger seat. I chose to put it behind the passenger seat since mounting under the hood would expose it to too much heat, and mounting it in the passenger footwell would take up space where I want to install a fire system. The new battery is 13 lbs, the old one is 39 lbs (26 lbs savings). I think I figured out a way to install an external kill switch too...I'm just not positive that it will shut down the current from the alternator.
I'm going to finish up the carbon hood and trunk this weekend, I just got in 12 more yards of material and some new low temp epoxy so I should be all set. After the hood and trunk are mounted, I can get the car back over to the scales to see what kind of progress I've made. Plus, I wouldn't mind driving it again, it's been sitting for a couple weeks. I ended up buying a Corbeau seat for the car from the previous owner, so that should help with weight as well. It's actually not that bad of a seat. I initially wanted to get an OMP seat with the halo head protection, but they run about $700 each. The Corbeau is a much better choice right now.

Saturday, November 24, 2007

Carbon hood and trunk lid


I got started on the carbon hood and trunk lid this weekend and it's been pretty slow going. The problem is that it is pretty cold outside and the epoxy that I got likes about 85 degrees to cure. It's taking forever to cure, and wetting out the carbon is a little tricky when the epoxy gels on the cold spots. Radiant heaters help, but not enough.

On top of that, I ordered the wrong S-Glass from Aircraft Spruce...it is WAY too lightweight to do anything to the structure. Of course I used it anyway and now the hood and trunk lid are too thin. Now I get to order 3 more yards of carbon and 8 more yards of 8oz. S-glass. Hopefully with 4 more layers of glass and carbon the pieces will hold their shape a little better. End weight should be about 8-10lbs for the hood and 5lbs for the trunk lid. I'm also going to try a different epoxy. The stuff I'm looking at cures in 30 minutes and has a good cold cure down to 40 degrees. Hopefully that saves the day.

I'm not really sure if the weight savings are going to justify all the work going into this, but it's pretty fun and I'm learning quite a bit. For example, Meguire's car wax works 1000x better than PVA mold release. That was a waste of money, and probably made the parts stick even worse. All in all I'm guessing a savings of about 85lbs (30lbs from the hood, 40lbs from the roof, 15lbs from the trunk lid).

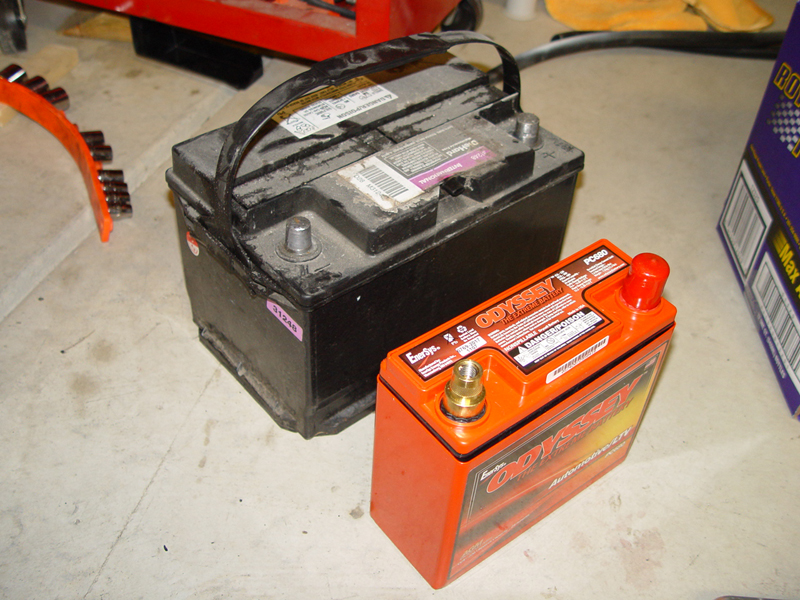
In other news, I ordered an Odyssey PC680 battery, that should save another 30lbs or so. I need to check the SCCA rules to see if I can mount it in the cabin, near the passenger seat. I would mount it under the hood, but heat is never a good thing for batteries, especially being near the turbo.